|
 |
|||||

MGB 314
ML 270
ML 160
HMS Campbeltown
ML 447
ML 192
ML 457
ML 262
ML 307
ML 267
ML 443
ML 268
ML 306
ML 156
ML 446
ML 177
ML 298
MTB 74
GROUP TWO
GROUP THREE
Troops to land via Caisson
This ML carried a 14-man team led by Captain Michael Burn and Lieutenant Tom Peyton. Their task was to come ashore in the Old Entrance, destroy the flak towers west of the northern dock caisson and form a defensive block east of the caisson. Should Campbeltown fail to ram, they were to destroy the guns adjacent to the outer caisson. Sadly the boat was hit early on, lost control, struck the Old Mole and burned out. Eight of her Commando party were killed, along with four crew.
Lieutenant-Commander 'Billie' Stephens, RNVR
Sub-Lieutenant Sam Haighton, RNVR (No. 1)
Sub-Lieutenant Richard Collinson, RNVR
(plus 14 crew)
Lieutenant Tom 'Nero' Boyd, RNVR
Sub-Lieutenant James Adie Tait, RNVR (No. 1)
Sub-Lieutenant John G. Hall, RANVR
(plus 11 crew)
Being part of the Forward Striking Force, this ML carried no troops. As instructed she bombarded, and subdued, flak positions in the line of Campbeltown's approach, then proceeded up-river in search of targets of opportunity. Upon returning to the area north of the Old Mole she placed herself between the burning ML 447 and nearby enemy positions, and took off her crew. Although herself damaged she succeeded in returning to the UK in company with MLs 443 and 307.
Lieutenant Dunstan Curtis, RNVR
Sub-Lieutenant Bill Brooker, RNVR (No. 1)
Sub-Lieutenant Chris Worsley, RNVR
(plus 17 crew, Naval and Military HQ Parties and
press correspondent Mr. Gordon Holman)
The gunboat carried both Naval and Military HQs into the estuary, all the while taking soundings in advance of Campbeltown. Having landed Colonel Newman's party, confirmed Campbeltown's status and taken survivors on board, she bombarded the Mole positions before withdrawing downstream. Having been hit numerous times, she was eventually scuttled.
Lieutenant C.S.B Irwin, RNR
Lieutenant Bill Wallach, RANVR (No. 1)
Sub-Lieutenant G.V. Fisher, RNZNVR
(plus 14 crew)
Also part of the Forward Striking Force, carrying no troops, ML 270, manoeuvred, in a supporting role, in the area between the Old Entrance and Old Mole. She sustained a hit, aft, which disabled her hydraulic steering and required her crew to fit her secondary tiller, steering while under fire. She then limped downstream and was eventually scuttled after her crew were taken on board the destroyer HMS Brocklesby.
Lieutenant T.D.L. Platt, RNR
Lieutenant H.S. Chambers, RNVR (No. 1)
Lieutenant Graham Baker, RCNVR
(plus 12 crew)
ML 447 carried the only Assault Party capable of clearing and securing the Old Mole for additional landings and later reembarkation. This 15-man team led by Captain David Birney and Lieutenant Bill Clibborn, had already suffered casualties by the time they reached the Mole, and they and the crew suffered even more as attempts to come alongside the slipway were met with grenades and heavy close-range fire. The ML, ablaze, eventually backed away from the Mole, whereupon Boyd's returning ML 160 came alongside and took off survivors.
Lieutenant Ted Burt, RNVR
Sub-Lieutenant 'Robbie' Roberts, RNVR (No. 1)
Sub-Lieutenant Kenneth Hills, RNVR
(plus 13 crew)
ML 262 carried Lieutenant Mark Woodcock's Demolition Party and his Protection team led by Lieutenant Dick Morgan. Their targets were the lock gates and swing bridge (G) in the Old Entrance. In the confusion this ML ran too far upstream then returned, coming under Campbeltown's stern to land her parties in the Old Entrance. Responding to mistakenly identified withdrawal signals these parties were reembarked, along with men from other parties in the area. Taking hits all the time, ML 262 attempted to withdraw and was disabled while attempting to assist ML 457. She eventually blew up after her survivors had abandoned ship.
Lieutenant Tom Collier, RNVR
Sub-Lieutenant Kenneth Hampshire, RNVR (No. 1)
Sub-Lieutenant G.E.A. Barham, RNVR
(plus 12 crew)
Lieutenant Norman Wallis, RANVR
Sub-Lieutenant Leo Clegg, RNVR (No. 1)
Sub-Lieutenant J.A.G. Williamson, RNVR
(plus 11 crew)
Lieutenant Eric Henry Beart, RNVR
Lieutenant David Lloyd-Davies, RCNVR
Sub-Lieutenant William Pirie-Mewes, RNVR
(plus 13 crew)
Lieutenant Bill Tillie, RNVR
Sub-Lieutenant Kenneth Bachelor, RNVR
Sub-Lieutenant Douglas Garnham, RNVR
(Plus 12 crew)
Lieutenant Kenneth Horlock, RNVR
Lieutenant E.E.M Shields, RNVR (No. 1)
Lieutenant Peter Royal, RNVR
Lieutenant Reginald Verity, RNVR (Beachmaster)
(plus 15 crew)
Lieutenant Ian Henderson, RNVR
Sub-Lieutenant Philip Dark, RNVR (No. 1)
Sub-Lieutenant Pat Landy, RANVR
(plus 11 crew)
Lieutenant Dick Falconar, RNVR
Sub-Lieutenant John A. May, RNVR (No.1)
Sub-Lieutenant Hugh Arnold, RNVR
(plus 12 crew)
Acting Lieutenant Bob Nock, RNVR
Sub-Lieutenant Arthur Spraggon, RNVR (No. 1)
Sub-Lieutenant Dennis Vardon-Patton, RNVR
(plus 13 crew)
Sub-Lieutenant R.C.M.V. Wynn, RNVR
Sub-Lieutenant Athol Francis O'Connor, RNZNVR
(plus 8 crew)
Lieutenant Leslie Fenton, RNVR
Sub-Lieutenant N.G. Machin, RNVR (No. 1)
(plus 10 crew)
Lieutenant Mark Rodier, RNVR
Sub-Lieutenant Frank Arkle, RNVR (No. 1)
Sub-Lieutenant Walter Heaven, RNVR
Sub-Lieutenant (E) A.J. Toy, RNVR (20th Flotilla Base)
(plus 12 crew)
Lieutenant-Commander Sam Beattie, RN
Lieutenant Christopher Gough, RN (No. 1)
Lieutenant Nigel Tibbits, RN
Surgeon-Lieutenant 'Jock' Winthrope, RCNVR
(Click HERE for Crew list)
MTB 74 was a last-minute addition to the fleet. Equipped with special, motorless, demolition torpedoes designed for attacking heavy German warships at close range, she was assigned a back-up role should Campbeltown fail to ram - in which case she would torpedo either the outer caisson, or the inner one should the dock be open to the Loire. In the event she was not required for either purpose and, having fired her torpedoes at the Old Entrance lock gates, came alongside the Gunboat, took on board survivors from Campbeltown, and made for the open sea. Almost within sight of freedom she stopped to rescue men on a raft, and was hit and destroyed with heavy loss of life.
As a 'spare' ML, the 298 carried no troops. In action she manoeuvred in the narrows between the harbour and the gun batteries on the far side of the estuary, giving covering and suppressing fire-support. At the conclusion of the action she came in under Campbeltown's stern to check the Old Entrance for troops in need of transport home, but found none. En route past the Mole she passed through burning petrol and caught fire astern, shortly after which she was hit, eventually blowing up following the evacuation of her crew.
All material contained in this site is subject to copyright and must not be reproduced in any format without the consent of the relevant copyright holder
Carrying Troop Sergeant Major George Haines' 15-man portion of Captain Hooper's Special Task Party, this was the only ML to land troops successfully in the Old Entrance. Ordered alongside Campbeltown she then took off a major portion of her crew, including Lieutenant Commander Beattie and most of the destroyer's officers. Making for the open sea she was hit and set on fire amidships. With her motors out of action and the fire spreading, she was abandoned and left to burn out. Amongst her casualties were Lieutenants Tibbits, Gough and Rodier, Surgeon Lieutenant Winthrope and Sub-Lieutenant Toy.
This ML carried 15 men, the first portion of Captain Dick Hooper's Special Task Party, whose primary task it was to knock out suspected gun positions on the foreshore north of the Mole, silence the ships in the 'Normandie' dock and come into Newman's HQ reserve. Almost within sight of the Old Entrance she was hit and disabled, with one engine put out of action, her steering gone and casualties mounting. Steering by tiller she limped out of the estuary and was scuttled following the transfer of her crew and troops to HMS Atherstone.
Carrying an 11-man party led by Regimental Sergeant Major Alan Moss, this ML also ran too far upstream, eventually turning back when abreast of the partially completed aircraft carrier Joffre. She attacked a dredger with grenades, then came in under Campbeltown's stern and attempted to put her troops ashore in the Old Entrance. Under heavy fire she nosed onto the foreshore, however the men who did succeed in disembarking were soon forced back. As the ML prepared to withdraw downstream she was fatally hit and abandoned, RSM Moss being amongst those lost.
The only ML to land successfully at the Old Mole, the 457 carried a total of 15 Commandos, split into Lieutenant Philip Walton's Demolition Party, his Protection team led by Second Lieutenant Bill 'Tiger' Watson, and a Demolition Control party led by Captain Bill Pritchard, RE. Her captain, Lieutenant Collier, had undertaken to wait for the parties to return, and in doing so held position under heavy fire with the inevitable consequence that the launch was struck again and again and eventually destroyed. As the area was so 'hot' Collier refused an offer of assistance from the withdrawing ML 262 lest she too, be sunk. (See ML 262 entry)
In one of the great tragedies of the raid this ML was hit while preparing to turn into the Old Entrance. She blew up with significant casualties to her crew and Commando parties: of the latter only 2 survived from a total of 17. Captain Harry Pennington's 5-man Demolition team was wiped out, as was his Protection Party led by Lieutenant Morgan Jenkins. Travelling with them were a 7-man contingent from RSM Moss's Party on ML 267. Pennington had been tasked with securing the northern access to the Commando operating area by destroying the bridge (M) connecting the dry dock to the Caserne des Douanes. As a consequence, that access point was never closed off.
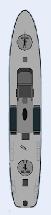
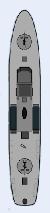
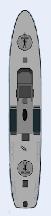
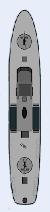
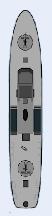
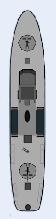
This illustration shows the general arrangement of the fleet as it entered the estuary, based on Commander Ryder's own plans. The distance between MLs in each column was planned to be one cable (about 185 metres), the distance between port and starboard columns was also set at one cable, and the distance between Campbeltown and MGB 314 was planned to be around 2.5 cables. The length of the whole formation therefore approached one nautical mile.
ML 307 carried a 7-man Demolition party led by Captain Bill Bradley (their Protection Party embarked on ML 443). Also on board were a medical team Under Captain David Paton, RAMC, and a second journalist, Mr Ted Gilling. Bradley's task was to destoy the central lock gates in the New Entrance (C) on Town Plan. The ML did manage to come close to the Mole slipway, engaging German forces on the structure, but ran aground and had to back away. She then engaged German positions on the far side of the estuary before withdrawing. ML 307 returned to the UK in company with MLs 160 and 443.
Six MLs to land in the Old Entrance
GROUP ONE
Six MLs to land at the Old Mole
The Attack Formation
HMS Campbeltown carried Commando parties tasked with the destruction of the dry dock facilities remaining after ramming. For a full list of personnel click HERE
Tasked with destroying target group 'Z' (the Power Station complex on the east side of Bridge 'B' - still extant today, click HERE) this ML carried a 15-man team led by Lieutenants Wilson and Bonvin, and Second Lieutenant Basset-Wilson. Oddly, she also carried Lieutenant Joe Houghton's Protection party for Captain Bill Bradley on ML 307. This gave her a total of 20 Commandos, far more than any other of the Coastal Forces vessels. In the confusion around the Old Mole, and blinded by searchlights, she sailed too far north then, on returning, found burning MLs blocking her route to the Mole. Retiring, she returned to the UK in company with MLs 160 and 307.
ML 306 carried Lieutenant Ronnie Swayne's 9-man Demolition party, whose targets were the lock gates and bridge ('B') at the southern end of the New Entrance - close to target group 'Z'. Lieutenant John Vanderwerve led Swayne's 5-man Protection team. This ML failed to come ashore at the Old Mole, and retired to the open sea where she encountered and engaged the much larger German Torpedo-boat destroyer Jaguar. Eventually forced to capitulate, her crew and Commando parties were taken off, and the ML was retained as a prize later entering German service. For his action in manning the ML's twin-Lewis in spite of multiple wounds, Sergeant Frank Durrant, who did not survive, was awarded the Victoria Cross.
Originally a 'spare' ML, the 446 took on board ML 341's Commandos and Medical Party following that ML's decision to return to port with mechanical issues. She eventually caught the main force but, as with others, failed to identify the Mole slipway in the glare of searchlights. Upon returning to the Mole the situation was clearly hopeless, as Captain Bertie Hodgson was already dead, and Lieutenant Oughtred severely wounded - amongst other casualties. She then withdrew and was eventually scuttled having evacuated her crew and Commandos onto HMS Atherstone.